Rice is so integral to Japanese cooking that the words for “cooked rice”,
Think of them like Japanese sandwiches, ready to pick up and eat on the go. Onigiri along with nikuman are popular snack or lunch options for when you are out hiking!
Normally, onigiri is slightly triangular in shape, wrapped in nori (海苔, seaweed) with a yummy filling tucked inside. No, though its main ingredient is rice, onigiri is not sushi. Best yet? This delectable meal is super easy to make.

[Editor’s Note: This post was originally published in July of 2016 and has been updated for freshness, accuracy, and comprehensiveness.]
Disclosure: Kristenabroad.com is a participant in the Amazon Services LLC Associates Program and other affiliate programs. For some links to products or services in this article, I may earn a small commission by you using my link. The price for you is not affected.
The Rice
There are two types of japonica rice used in Japan. In Japanese, the rice used for onigiri is called 粳米 (うるちまい, uruchimai) or “normal rice”. What makes it normal? It’s NOT used for mochi. Mochi (餅 or 糯) is glutinous rice and has even greater stickiness when cooked. They are both short grain but uruchimai is translucent whereas mochigome (もち米, mochi rice) is more opaque.
There are many, many different types of rice in Japan, the supermarket can be overwhelming. Some popular varieties are 越光 (koshihikari) and ササニシキ (sasanishiki). The later is known for good use in sushi and is sometimes advertised at restaurants. They tend to be quite expensive but will be some of the best rice you’ve ever tried.
Outside Japan? Look for sushi rice, the usual marketing name of uruchimai. (Do NOT get “sticky rice”, completely different!!!). Remember, this isn’t sushi! Vinegar is what makes sushi rice, among other things, like dashi. The only seasoning you will need for rice used for onigiri is salt.
Proper Rice Making technique
First things first – you want to rinse Japanese rice really well until the water runs clean and then soak. I highly suggest a rice cooker or 炊飯器 (すいはんき,
Japanese rice cookers are some of the best in the world. Two of the most popular brands are Zojirushi (my favorite) and Tiger. They do amazing things with their fuzzy logic controls. Fuzzy logic allows the machine to “think” and adjust time and temperature settings so that the rice turns out perfect – every time. I suggest getting one around 5 cups, which is more than enough for a family. My first was 10 cups and WAY to big. Don’t worry, they make models ready for overseas!
Rice cookers are great to set up the night before. Not only does that give the rice a good soak, but you can also put them on a timer! Set it to go off before you wake so you can make fresh onigiri or a nice bento before work.
Alton Brown would hate me for saying to buy a “uni-tasker” appliance but you can also use them for other things, like bread, believe it or not.
Rice cookers will keep rice warm and moist so it will keep that way for several hours. Or if you want to be fancy you can use a お櫃 (おひつ,
Rice cooker or
How to make onigiri by hand – and not get all messy!
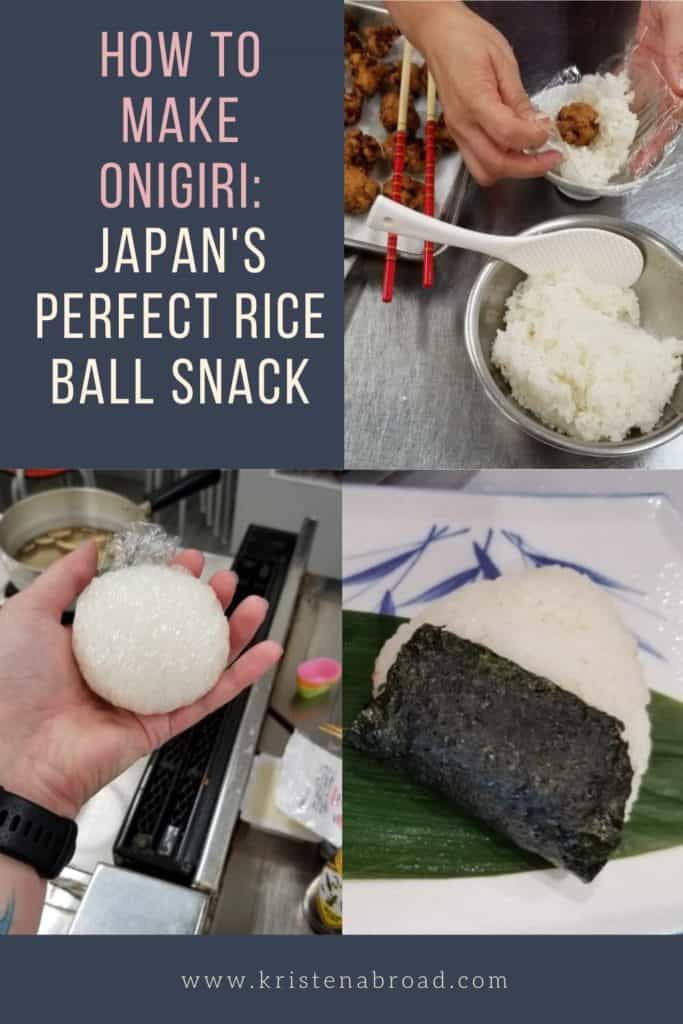
After you have your yummy salted rice all ready to go, the easiest way is to start with some saran wrap and a bowl. Place the saran wrap over the bowl and spoon the rice mixture in. You can then use the paddle to give yourself a bit of room for the filling. However, if you want just rice – go ahead! Filling not required! What else is not required? Triangular shaped onigiri. They can be square, balls, cute little characters, anything your heart dreams up.

Next, pick up the mixture and with your hands on the outside, move the rice around any filling you may have and then cover fully with saran wrap and form into a shape. Remove saran wrap and voila! You’ve got some onigiri. You can cover with some nori if you’d like but also, not required!

What to use for fillings?
The sky is really the limit when it comes to onigiri fillings. Some of the more typically seen at the supermarket or convenience store are:
- 梅干し, umeboshi, pickled plums
- サーモン, salmon
- えび or 海老,
ebi , shrimp - 納豆, natto, fermented soybeans
- 唐揚げ, からあげ,
karaage , fried chicken
Salmon and tuna you can sometimes find by themselves but normally they have mayonnaise mixed in. Ever heard of “sea chicken”? Nope, not just an American joke! You will see “Tuna Mayo” is often called “Sea Chicken Mayo”. Look for: シー チケン (sea chicken) マヨネーズ (mayonnaise) sometimes you’ll see just マヨ (mayo). I even like to add some miso to mine which works super yummy when you grill them a little bit. This is called “焼きおにぎり” or “yaki onigiri”.
How to make onigiri with a mold
Another option for making onigiri is to use a cute mold. I personally like all of the fun animal shaped ones, like this kitten onigiri mold. They normally come with stencil cutters to make the nori add to the cuteness.
How to eat store bought Onigiri
If you are lucky enough to be in Japan (or I have seen them elsewhere in Asia), I highly suggest you try some store-bought onigiri for the experience. One, they are tasty, and two, you save time! Find them in the refrigerator section. Yes, serve them cold, no matter the filling.

With homemade onigiri, the nori will generally be more soft by the time you eat it because of it soaking in some of the moisture from the rice. At convenience stores (or konbini, コンビニ) intricately folded plastic will separate the nori from the rice. Each package will have 1, 2, 3 labelled on it so you know how to disassemble your yummy snack. Split the packaging in half and carefully pull out the sides without damaging the nori. Grab the pieces and dig in!

Not up to speed on your Japanese yet? Look for the English when you buy your onigiri at the store. The packaging isn’t always Japanese.
In case you need a visual, there’s one on the bottom! Why’s this next image right-to-left? Welcome to t

What’s your favorite onigiri?
Pin this for Later


Pingback: okaymmo
Very interesting! It looks very delicious and easy to make! Love the Alton Brown reference and yes, he does not like uni-taskers lol.
One of my favorite snacks for sure! So easy for something on the go. And glad you caught the reference ;), sadly, I know people that don’t know who he is! My parents got to meet him at a book signing a few years ago, was so jealous!